Why Your Roti Puffs (Or Doesn't): The Real Science Behind South Asia's Most Essential Flatbread
There's a moment every home cook chases — the one where a disc of rolled dough hits a hot pan and slowly, almost dramatically, inflates into a perfect pillow of bread. If you've grown up watching a grandmother or parent work a tawa with seemingly zero effort, you already know how effortless it looks. And if you've tried to replicate it yourself in an American kitchen, you probably also know how stubbornly uncooperative roti can be.
The good news? That puff isn't some inherited kitchen intuition. It's science. And once you understand what's actually going on inside that little disc of dough, you'll stop guessing and start baking with real confidence.
It All Starts With the Dough: Hydration Is Everything
Most roti recipes call for atta — a whole wheat flour milled from hard wheat varieties common across South Asia. If you're in the US, you can find it at Indian grocery stores, South Asian markets, or online. In a pinch, a blend of whole wheat and all-purpose flour gets you close, but atta's finer grind and specific protein content really do matter.
When you mix atta with water, two proteins — glutenin and gliadin — combine to form gluten. This network is what gives dough its stretch and structure. The amount of water you add (your hydration level) directly controls how pliable and extensible that gluten becomes.
For roti, you're aiming for a dough that's soft but not sticky — somewhere around 55 to 60 percent hydration by weight. Too dry, and the dough tears when you roll it thin. Too wet, and it sticks to your rolling pin and bakes unevenly. A lot of home cooks in the US underhydrate their dough out of caution, which is actually one of the most common reasons roti comes out stiff and flat.
Pro tip: Add water gradually and knead for at least 8 to 10 minutes. Then let the dough rest, covered, for 20 to 30 minutes. That rest isn't optional — it allows the gluten to relax so you can roll the dough thin without it springing back.
The Rolling Phase: Thickness Matters More Than You Think
Roti should be rolled to roughly 1 to 2 millimeters thick — about the thickness of two stacked dimes. This is thinner than most beginners attempt. When dough is too thick, steam can't build up fast enough to separate the layers and create that puff.
Roll from the center outward, rotating the disc as you go to keep it even. Uneven thickness is the enemy of a uniform puff. If one side is thicker, the steam escapes unevenly and you end up with a lopsided bubble instead of a full balloon — or no puff at all.
Flour your surface lightly but consistently. Too much flour on the outside of your roti creates a barrier that interferes with how the bread interacts with the heat.
What Actually Causes the Puff: Steam, Layers, and a Very Hot Pan
Here's where it gets genuinely interesting. When your rolled roti hits a properly preheated tawa or cast iron skillet, the surface moisture begins to evaporate almost instantly, creating a thin, partially cooked skin on the bottom. That skin acts like a seal.
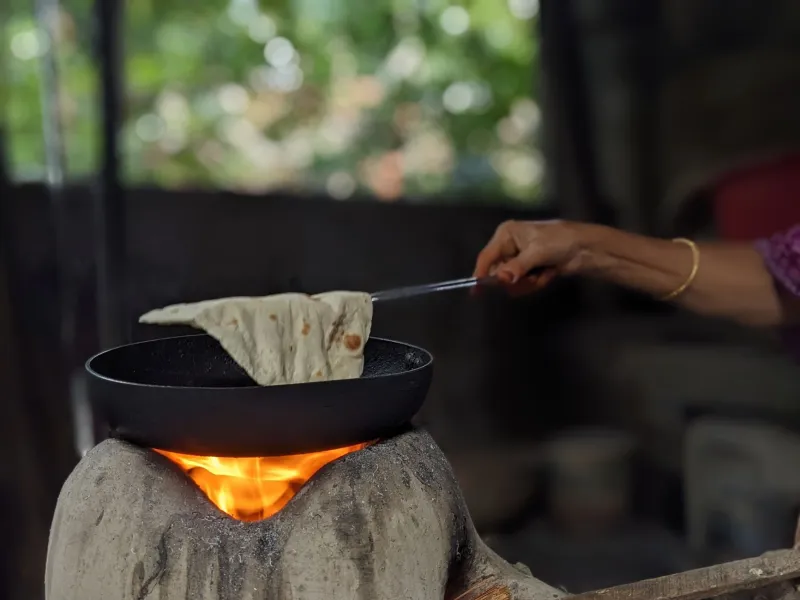
As you flip the roti and the opposite side cooks, moisture trapped inside the dough converts to steam. Because the outer layers have already set into a semi-rigid structure, that steam has nowhere to go — so it pushes outward between the layers, inflating the bread from the inside. That's your puff.
For this to work, your pan needs to be genuinely hot before the roti goes on. Not medium heat — hot. If the pan isn't hot enough, the dough cooks too slowly, moisture escapes gradually instead of building up, and you get a flat, chewy result. In most American kitchens, a cast iron skillet preheated over medium-high for three to four minutes does the job.
The second flip — or moving the roti directly over an open flame — intensifies the steam buildup and gives you that dramatic full puff. If you have a gas stove, you can use tongs to hold the roti directly over the burner for a few seconds after the second flip. Electric stove? Press gently with a folded kitchen towel on the second side while it's still in the pan. It encourages the steam to distribute evenly.
Troubleshooting Your Flatbread: Common Problems, Real Solutions
Roti isn't puffing at all: Your pan probably isn't hot enough, or your dough is too thick. Try rolling thinner and cranking up the heat.
Roti puffs in one spot only: Uneven rolling. Practice keeping the disc uniform in thickness.
Roti comes out hard or chewy: Either underhydrated dough or overcooked. Roti should only spend about 30 to 45 seconds per side on the tawa.
Roti tears when rolling: Dough needs more rest time or more hydration. Cover and let it sit longer.
Roti sticks to the pan: Your pan isn't seasoned well, or you're using too much surface flour. A well-seasoned cast iron or a dedicated tawa shouldn't need oil for basic roti.
Regional Variations: From Chapati to Paratha, the Rules Shift
It's worth noting that not all South Asian flatbreads follow the same logic. Chapati is essentially a thinner, drier cousin of roti — the terms are often used interchangeably, but in many households, chapati skips the open-flame step entirely. Phulka, on the other hand, is specifically the version that puffs fully over a flame, and it's the gold standard in many North Indian homes.
Paratha is a whole different animal. Made with layered dough — often folded with ghee or butter between the layers — paratha relies on fat, not just steam, to create its flakiness. The puff isn't really the goal here; it's the crisp, laminated texture that makes it irresistible. Hydration for paratha dough tends to be slightly lower, and the cooking process involves oil or ghee in the pan.
Then there's the Malabar parotta from South India, which is laminated in a completely different way — stretched and coiled before cooking — and produces a layered, almost croissant-like result. Each of these breads has its own set of physics, but understanding the fundamentals of gluten and steam gives you a foundation to work from no matter which style you're attempting.
The Takeaway
Roti is one of those foods that looks simple and reveals its complexity the moment you try to make it consistently. But it's not mysterious — it's just chemistry. Get your hydration right, roll thin and even, preheat your pan properly, and let steam do its job. Once those variables click into place, that puff stops being a happy accident and becomes something you can count on every single time.